Welcome to GongMH's Blog!
keep study.-
JSON and Go
1. 引言
解析JSON字符串,弱类型语言例如PHP来说
json_encode()和json_decode()就能很好的完成功能,但是对于强类型语言Go来说,解析JSON字符串就需要考虑一些情况了,下面我们对Go对JSON的转换做一些介绍。2. 编码
在Go中,使用
Marshal函数进行JSON的编码:func Marshal(v interface{}) ([]byte, error)如下示例所示,
//Go data structure, Message
type Message struct {
    Name string
    Body string
    Time int64
}

//an instance of Message
m := Message{"Alice", "Hello", 1294706395881547000}

//JSON encode
b, err := json.Marshal(m)

//If all is well, err will be nil and b will be a []byte containing this JSON data
b == []byte(`{"Name":"Alice","Body":"Hello","Time":1294706395881547000}`)
只有能够表示为合法JSON的数据结构才能被编码:
- JSON对象只支持key为string,即Go的map类型为
map[string]T(其中T为json包支持Go的任意类型) - channel、complex和function type不能被编码
- 循环数据结构不能被编码(将会导致Marshal进入无限循环)
- 指针将会被编码为指针所指的值(指针为nil的编码为null)
json包只能访问结构体的可访问field(大写字母开头的field),因此结构体中只有可访问的field才能表示为JSON的输出。
3. 已知类型解码
解析已知类型的数据,我们可以使用
Unmarshal函数:func Unmarshal(data []byte, v interface{}) error如下示例所示,
//create a place where the decoded data will be stored
var m Message

//call json.Unmarshal, passing it a []byte of JSON data and a pointer to m
err := json.Unmarshal(b, &m)

//If b contains valid JSON that fits in m,
//after the call err will be nil and the data
//from b will have been stored in the struct m,
//as if by an assignment like
m = Message{
    Name: "Alice",
    Body: "Hello",
    Time: 1294706395881547000,
}
对于JSON字符串中一个已知key
Foo,Unmarshal将查找目标结构体的field:- 有
Footag的可访问field - 名字为
Foo的可访问field - 名字为
FOO、FoO或其他与Foo匹配不区分大小写的可访问field
对于JSON字符串不严格匹配定义的数据结构,Unmarshal只解析可以在目标数据结构中能找到的field。因此在下面的例子中,只有Name字段会被解析,而Food字段会被忽略。
b := []byte(`{"Name":"Bob","Food":"Pickle"}`)
var m Message
err := json.Unmarshal(b, &m)
当我们想在一个很大的JSON结构中,只解析少量我们期望的field,这种方式是非常有用的。这也意味着目标结构中任何不能访问的field不会受到Unmarshal的影响。
4. 任意类型解码
对于未知的数据类型,json包使用
map[string]interface{}和[]interface{}来存储未知类型的JSON对象和数组;也可以将任意合法的JSON字符串解析为interface{}。默认的Go类型为:- bool对应JSON的类型booleans
- float64对应JSON的类型numbers
- string对应JSON的类型strings
- nil对应JSON的null
如下示例所示,
b := []byte(`{"Name":"Wednesday","Age":6,"Parents":["Gomez","Morticia"]}`)

var f interface{}
err := json.Unmarshal(b, &f)

//f would be a map,
//whose keys are strings
//and whose values are themselves stored as empty interface values
/*
f = map[string]interface{}{
    "Name": "Wednesday",
    "Age":  6,
    "Parents": []interface{}{
        "Gomez",
        "Morticia",
    },
}
*/
for k, v := range m {
    switch vv := v.(type) {
    case string:
        fmt.Println(k, "is string", vv)
    case float64:
        fmt.Println(k, "is float64", vv)
    case []interface{}:
        fmt.Println(k, "is an array:")
        for i, u := range vv {
            fmt.Println(i, u)
        }
    default:
        fmt.Println(k, "is of a type I don't know how to handle")
    }
}

/*
output:
Name is string Wednesday
Age is float64 6
Parents is an array:
0 Gomez
1 Morticia
*/
5. 引用类型
对于结构体中的 pointers、slices 和 maps ,Unmarshal将会分配存储结构并解析相应的引用类型。例如,如果JSON对象中存在Bar field,Unmarshal会new Bar结构并解析,否则Bar是nil指针。
type Foo struct {
    Bar *Bar
}
6. 流数据编码和解码
json包提供了Decoder和Encoder类型来支持通用的JSON数据的读写流,函数NewDecoder和NewEncoder分别处理 io.Reader 和 io.Writer 接口类型。
func NewDecoder(r io.Reader) *Decoder
func NewEncoder(w io.Writer) *Encoder
例如,从stdin中读入JSON对象,解析后移除除了Name之外的其他元素,然后输出到stdout中。
package main

import (
    "encoding/json"
    "log"
    "os"
)

func main() {
    dec := json.NewDecoder(os.Stdin)
    enc := json.NewEncoder(os.Stdout)
    for {
        var v map[string]interface{}
        if err := dec.Decode(&v); err != nil {
            log.Println(err)
            return
        }
        for k := range v {
            if k != "Name" {
                delete(v, k)
            }
        }
        if err := enc.Encode(&v); err != nil {
            log.Println(err)
        }
    }
}
在Go中,由于 Readers 和 Writers 无处不在,Encoder 和 Decoder 有很多的应用场景,例如HTTP链接的读写、WebSockets和file等。
7. 参考
- JSON对象只支持key为string,即Go的map类型为
-
Thrift介绍
-
github项目推荐--gitmoji-cli
今天推荐一个有意思的git项目
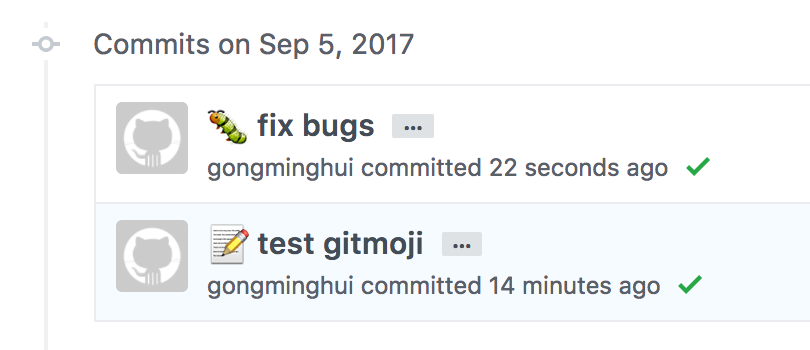
gitmoji-cli, gitmoji是一个在git commit信息中使用mojis的工具🎉。A gitmoji interactive client for using gitmojis on commit messages.
下面我们看看gitmoji的功能。gitmoji能够在commit信息中添加mojis图案,使得提交信息更容易辨识。
安装方法:
$ npm i -g gitmoji-cli$ gitmoji --help A gitmoji client for using emojis on commit messages. Usage $ gitmoji Options --init, -i Initialize gitmoji as a commit hook --remove -r Remove a previously initialized commit hook --config, -g Setup gitmoji-cli preferences. --commit, -c Interactively commit using the prompts --list, -l List all the available gitmojis --search, -s Search gitmojis --version, -v Print gitmoji-cli installed version --update, -u Sync emoji list with the repo Examples $ gitmoji -l $ gitmoji bug linter -s使用方法:
gitmoji主要用来生成commit信息,因此需要项目中已经进行了
git add something。gitmoji主要通过两种方式生成commit信息。方法1:直接生成
$ gitmoji -c手动执行上面命令,通过交互生成commit信息。
方法2:通过commit-hook
$ gitmoji -i将会生成文件 .git/hooks/prepare-commit-msg
然后每次进行
git commit的时候就会自动调用gitmoji,交互生成commit信息。其他命令
$ gitmoji -l//列出所有emoji$ gitmoji -u//同步repo中的emoji
-
Redis源码分析(004)--rio
1 引言
在redis中,RIO是对面向流的I/O的简单抽象。rio提供统一的read(从流中读数据)、write(将数据写入流)、tell(获取当前的偏移)等方法。rio实现了以下三种io:
Buffer I/O(内存I/O)、Stdio file pointer(标准文件)和File descriptors set(socket)。在选择相应的初始化后,就可以使用统一的方法对I/O进行操作。2 数据结构
一个
rio对象主要包含:- union型的数据块(记录每种I/O数据);
- 函数指针(设置read、write等函数);
- 通用变量(包含当前的校验和、字节数等信息)。
具体结构如下:
struct _rio {
    //统一功能函数指针
    size_t (*read)(struct _rio *, void *buf, size_t len);
    size_t (*write)(struct _rio *, const void *buf, size_t len);
    off_t (*tell)(struct _rio *);
    int (*flush)(struct _rio *);

    //更新校验和函数指针:计算到目前为止所有读写的校验和
    void (*update_cksum)(struct _rio *, const void *buf, size_t len);

    //记录当前校验和
    uint64_t cksum;

    //记录读/写的字节数
    size_t processed_bytes;

    //一次读写块的最大值
    size_t max_processing_chunk;

    //每种io类型独有的变量
    union {
        //内存buffer
        struct {
            sds ptr;
            off_t pos;
        } buffer;

        //标准文件
        struct {
            FILE *fp;
            off_t buffered; //到上次fsync,写入的字节数
            off_t autosync; //autosync之后的fsync写入的字节数
        } file;

        //多个fd集合(写多个socket)
        struct {
            int *fds;       //所有的fd
            int *state;     //每个fd的状态
            int numfds;
            off_t pos;
            sds buf;
        } fdset;
    } io;
};

typedef struct _rio rio;
3. 统一接口
rio提供了
rioWrite、rioRead、rioTell和rioFlush等统一封装的函数,在函数内部调用具体的实现函数。并且,rio给出每种I/O的初始化函数,用来设置rio对象的信息。当初始化rio后,就可以对该rio对象进行读写等操作。
//将buf写入rio
static inline size_t rioWrite(rio *r, const void *buf, size_t len) {
    while (len) {
        size_t bytes_to_write = (r->max_processing_chunk && r->max_processing_chunk < len) ? r->max_processing_chunk : len;
        if (r->update_cksum) r->update_cksum(r,buf,bytes_to_write);
        if (r->write(r,buf,bytes_to_write) == 0)
            return 0;
        buf = (char*)buf + bytes_to_write;
        len -= bytes_to_write;
        r->processed_bytes += bytes_to_write;
    }
    return 1;
}

//从rio中读出到buf
static inline size_t rioRead(rio *r, void *buf, size_t len) {
    while (len) {
        size_t bytes_to_read = (r->max_processing_chunk && r->max_processing_chunk < len) ? r->max_processing_chunk : len;
        if (r->read(r,buf,bytes_to_read) == 0)
            return 0;
        if (r->update_cksum) r->update_cksum(r,buf,bytes_to_read);
        buf = (char*)buf + bytes_to_read;
        len -= bytes_to_read;
        r->processed_bytes += bytes_to_read;
    }
    return 1;
}

//获取当前的offset
static inline off_t rioTell(rio *r) {
    return r->tell(r);
}

//刷新当前rio
static inline int rioFlush(rio *r) {
    return r->flush(r);
}

//初始化为文件
void rioInitWithFile(rio *r, FILE *fp);

//初始化为内存buffer
void rioInitWithBuffer(rio *r, sds s);

//初始化为多个socket fd
void rioInitWithFdset(rio *r, int *fds, int numfds);
3 I/O具体实现
Buffer I/O是维护在内存的sds变量,任何的操作都是是对内存变量的。对buffer io做flush将不做任何操作。Stdio file pointer是对磁盘文件的封装,封装了stdio.h中的相关文件操作,对外提供api。File descriptors set是对多个socket fd进行写入操作,不支持读取操作。当执行flush时,清空缓存中的内容。4 其他知识点
4.1 UNUSED宏定义
在redis中很多地方都会用到
UNUSED这个宏,UNUSED这个宏的主要用途就是抑制c编译器的未使用变量的warning。 具体可以参考“unused parameter” warnings in C/* Anti-warning macro... */ #define UNUSED(x) (void)(x)4.2 fflush与fsync区别
在文件io中,写入文件伪代码如下:
static size_t rioFileWrite(rio *r, const void *buf, size_t len) {

    retval = fwrite(buf,len,1,r->io.file.fp);

    fflush(r->io.file.fp);
    fsync(fileno(r->io.file.fp));

    return retval;
}
其中调用了
fflush和fsync,二者区别如下:fflush(FILE *); //c标准库函数,从c库缓存到内核缓冲区 fsync(int fd); //系统调用,从内核缓冲区写入到磁盘
-
Redis源码分析(003)--事件
Redis的事件包括文件事件和时间事件,在事件处理循环中不断处理文件事件和时间事件。redis将事件做了统一封装在
ae.h中,底层通过select、kqueue、epoll等实现,对外提供统一的api。而RPC请求的socket相关函数则封装在networking.h中来提供服务。整个事件过程就是针对event loop做添加、删除以及阻塞等待事件,在相应的事件上调用处理函数,从而完成redis的响应客户端请求、后台程序等过程。在学习redis时间之前我们先简单回顾一下相关基础知识。我们先简单介绍一下I/O多路复用。
1. I/O多路复用技术
I/O多路复用主要是为了提高io的效率,通过单线程/单进程对fdsets的读写等事件做监控,当事件到来时通过fd的回调函数做相应处理。主要实现有select、poll、kqueue和epoll等,具体参考博文。
2. reactor模式
wikipedia上对Reactor design pattern的定义如下:
The reactor design pattern is an event handling pattern for handling service requests delivered concurrently to a service handler by one or more inputs. The service handler then demultiplexes the incoming requests and dispatches them synchronously to the associated request handlers.
这句话是说Reactor是处理1个或多个输入同时发送服务请求的事件处理模式。Reactor通过将到来的请求多路复用,并且同步关联到相应的处理程序上。
Redis就是reactor模式的一种简单实现。通过此模式,redis提供高性能的服务响应。
3. redis事件流程
我们有了上述基本概念之后再去理解redis的事件就比较简单了。Redis的核心就是
Event Loop,同步不断的从Event Loop中获取已触发的事件,调用相应的回调函数进行处理的过程。下面通过伪代码将redis的流程做一下梳理,首先我们简单介绍一下几个函数的作用:
main函数是redis server的启动入口,包括创建event loop,添加event等;acceptTcpHandler、sendReplyToClient和readQueryFromClient是对应事件的回调函数;beforeSleep是每次循环进入阻塞前的处理函数;aeProcessEvents是时间阻塞函数,获取阻塞fd,调用相应的回调函数。
具体伪代码如下:
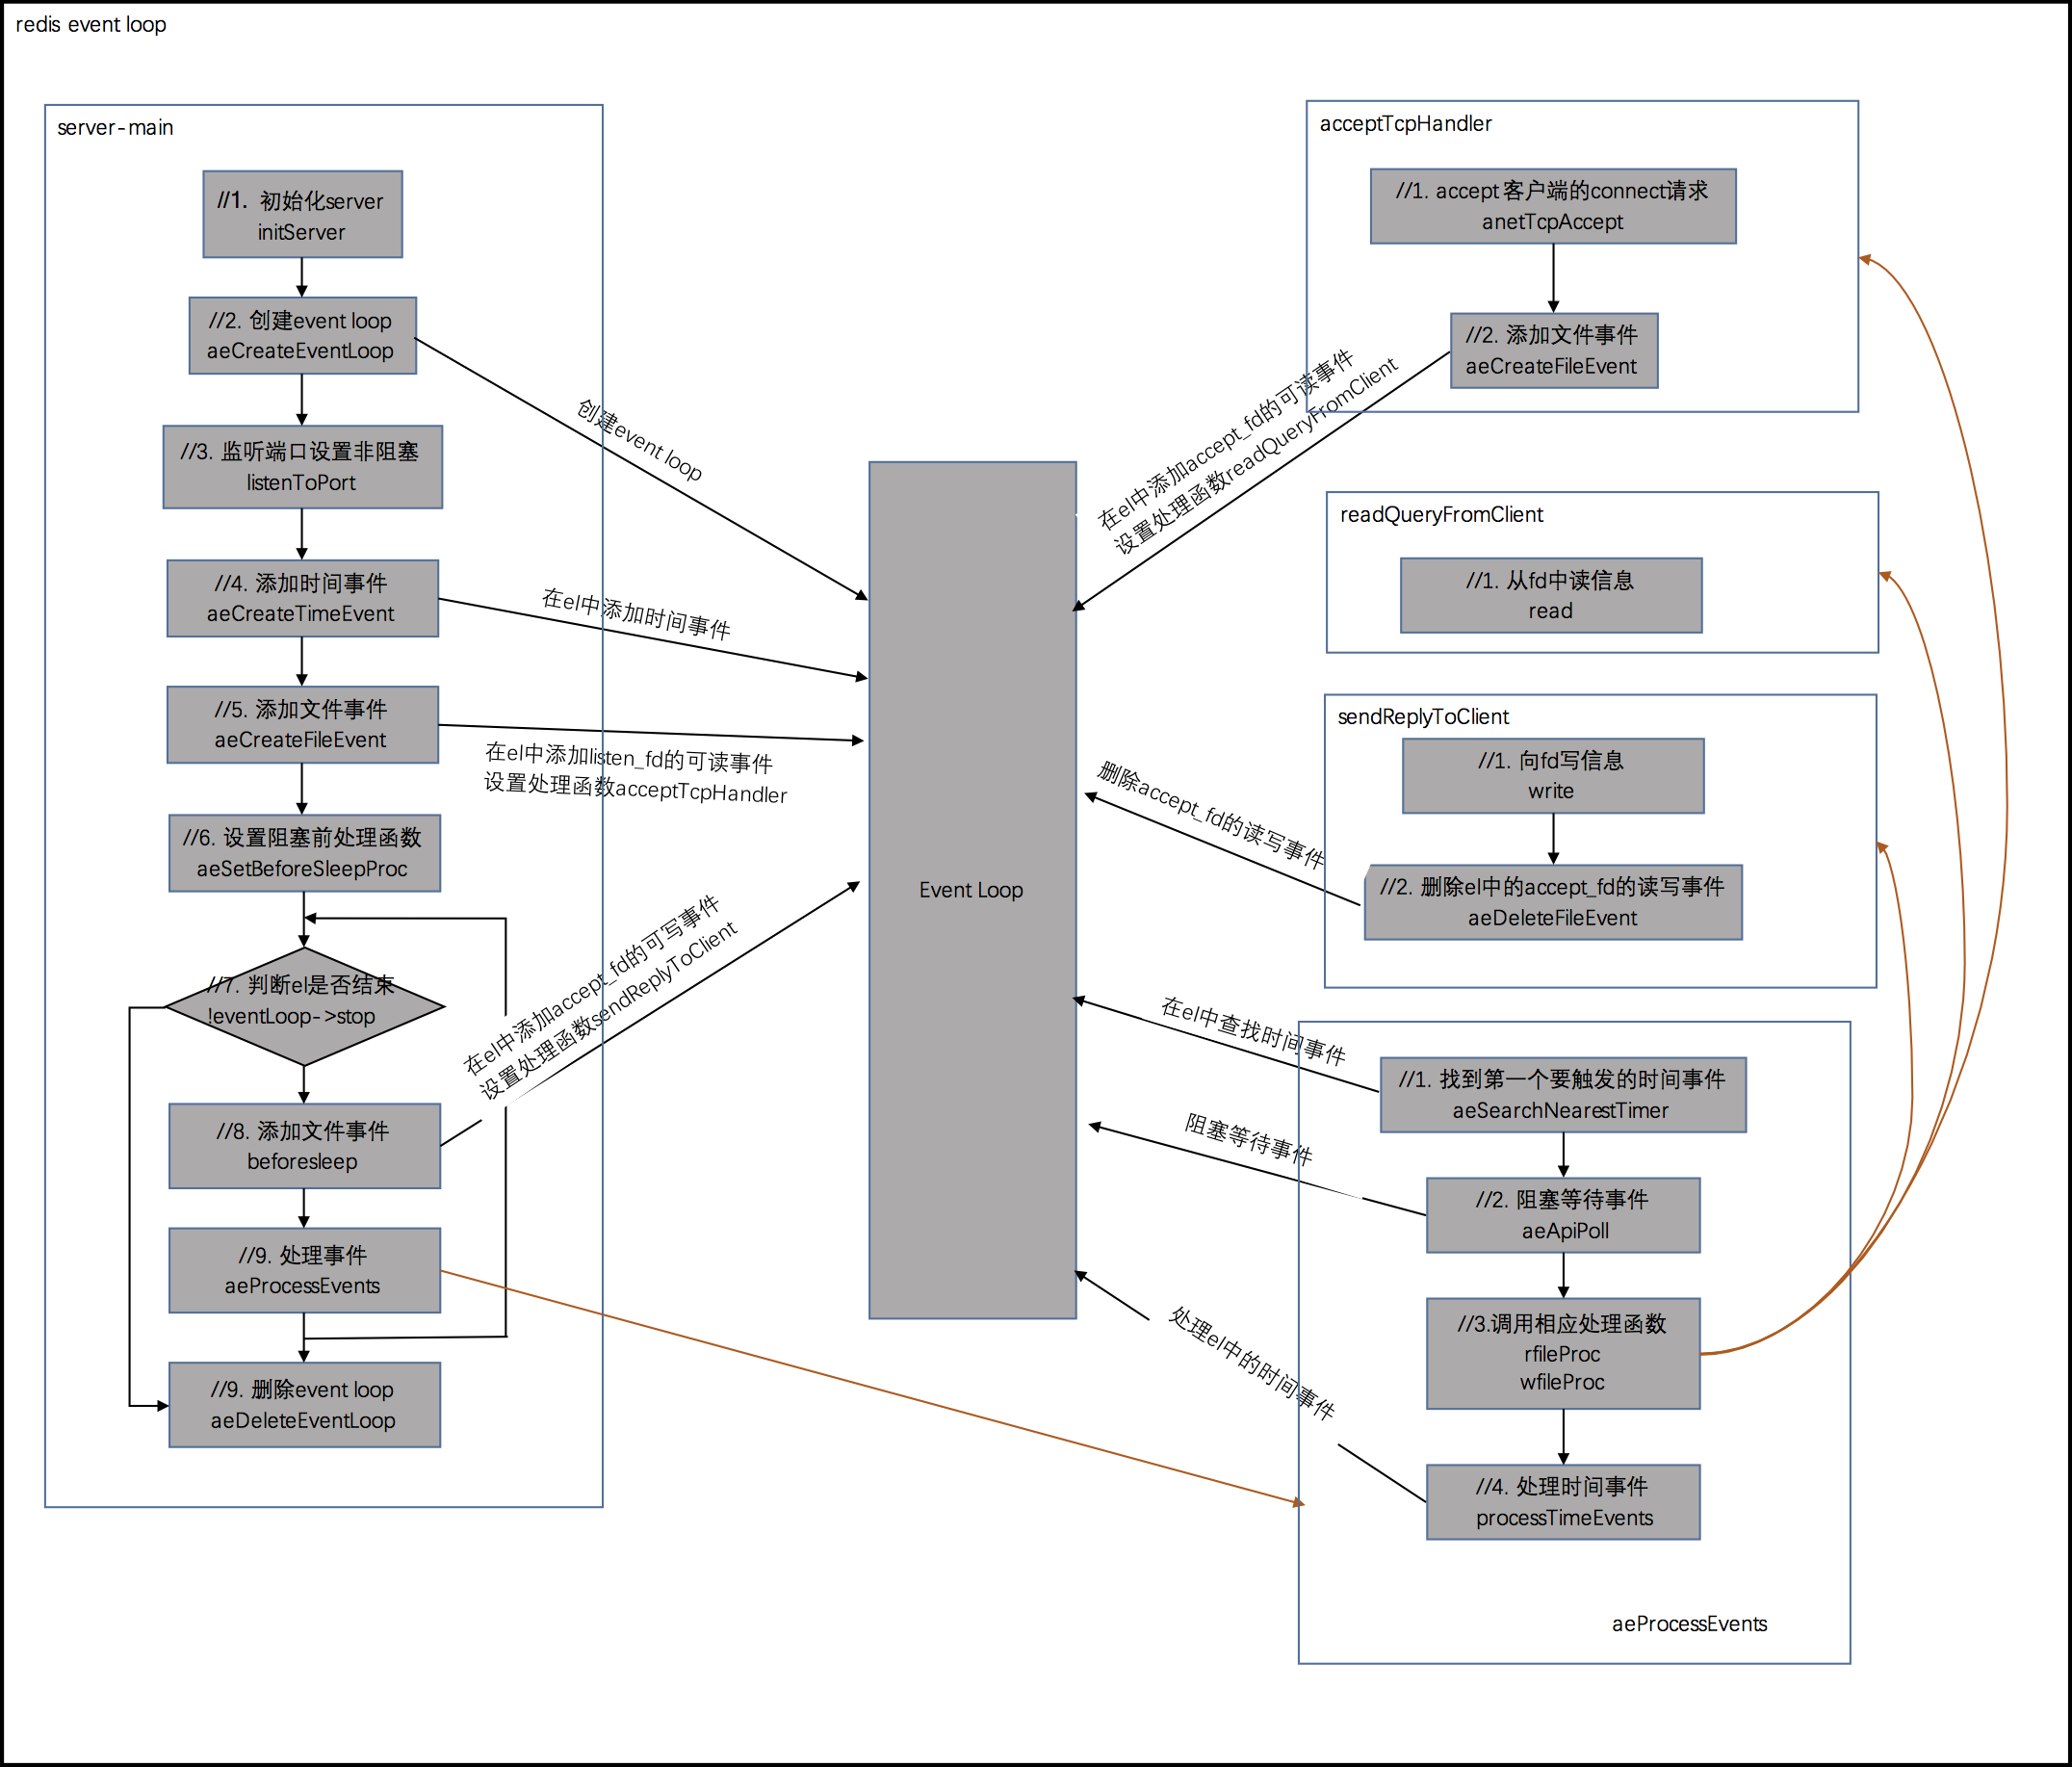
//入口
int main(){

	//1. 初始化server
	initServer();

	//2. 创建event loop
	aeCreateEventLoop(fdNum);

	//3. 监听端口设置非阻塞
	listenToPort(server.port,server.ipfd,&server.ipfd_count);

	//4. 添加时间事件,主要是后台操作
	aeCreateTimeEvent(server.el, 1, serverCron, NULL, NULL);

	//5. 添加文件事件,监听的fd是listen fd可读事件
	//并设置触发事件的处理函数acceptTcpHandler
	aeCreateFileEvent(server.el, server.ipfd, AE_READABLE, acceptTcpHandler,NULL);

	//6. 阻塞前的一些配置,设置sleep前的处理函数beforeSleep
	aeSetBeforeSleepProc(server.el,beforeSleep);

	//7. 处理事件
	while (!eventLoop->stop) {
		//执行事件前的工作
		eventLoop->beforesleep(eventLoop);
		//处理事件
		aeProcessEvents(eventLoop, AE_ALL_EVENTS);
	}

	//8. 删除event loop
	aeDeleteEventLoop(server.el);
}

//阻塞前的处理函数
void beforeSleep(struct aeEventLoop *eventLoop) {

	//1. 其他处理
	...

	//2. 添加文件事件,监听accept的fd的可写事件
	//并设置触发事件的处理函数sendReplyToClient
	aeCreateFileEvent(server.el, c->fd, AE_WRITABLE, sendReplyToClient, c);
}

//accept_fd可写的处理函数
void sendReplyToClient(aeEventLoop *el, int fd, void *privdata, int mask) {
	//1. 向客服端send信息
	write(fd, ((char*)o->ptr)+c->sentlen,objlen-c->sentlen);

	//2. 删除文件事件,删除accept的fd 读&写事件
	aeDeleteFileEvent(server.el,c->fd,AE_READABLE);
	aeDeleteFileEvent(server.el,c->fd,AE_WRITABLE);
}

//listen_fd可读的处理函数
void acceptTcpHandler(aeEventLoop *el, int fd, void *privdata, int mask) {
	//1. accept connect 请求
	cfd = anetTcpAccept(server.neterr, fd, cip, sizeof(cip), &cport);

	//2. 添加文件事件,监听已经accept的fd的可读事件
	//并设置触发事件的处理函数readQueryFromClient
	aeCreateFileEvent(server.el,fd,AE_READABLE,readQueryFromClient, c);
}

//accept_fd可读的处理函数
void readQueryFromClient(aeEventLoop *el, int fd, void *privdata, int mask) {
	//1. 从fd中读信息
	nread = read(fd, c->querybuf+qblen, readlen);

	//2. 如果读出错,删除fd的事件
	if(error(nread)){
		aeDeleteFileEvent(server.el,c->fd,AE_READABLE);
		aeDeleteFileEvent(server.el,c->fd,AE_WRITABLE);
	}

}

//事件阻塞处理函数
int aeProcessEvents(aeEventLoop *eventLoop, int flags){
	//找到第一个要触发的时间事件
	shortest = aeSearchNearestTimer(eventLoop);

	//获取事件,tvp与shortest相关,调用epoll_wait阻塞等待事件的到来
	numevents = aeApiPoll(eventLoop, tvp);

	for (j = 0; j < numevents; j++) {
		aeFileEvent *fe = &eventLoop->events[eventLoop->fired[j].fd];

		if (fe->mask & mask & AE_READABLE) {
			fe->rfileProc(eventLoop,fd,fe->clientData,mask);
		}
		if (fe->mask & mask & AE_WRITABLE) {
			fe->wfileProc(eventLoop,fd,fe->clientData,mask);
		}
	}

	//处理时间事件
	processTimeEvents(eventLoop);
}
4. 总结
对于redis的事件流程,简化为流程图更加直观明了,如图所示:
-
Linux基本命令--awk
1. 基本概念
awk是一种样式扫描与处理工具 awk是行处理器,相比较屏幕处理的优点,在处理庞大文件时不会出现内存溢出或是处理缓慢的问题,通常用来格式化文本信息。awk处理过程是依次对每一行进行处理,然后输出。
2. 基本应用
 awk '{ sum += $1 }; END { print sum }' file
 awk -F: '{ print $1 }' /etc/passwd
3. 工作流程
awk一次读取一行文本,按输入分隔符进行切片,切成多个组成部分,将每片直接保存在内建的变量中,$1,$2,$3,…。引用指定的变量,可以显示指定段,或者多个段。如果需要显示全部的,需要使用$0来引用。可以对单个片段进行判断,也可以对所有断进行循环判断。默认分隔符为空白字符。
4. 命令详解
4.1 用法
awk [ -F fs ] [ -v var=value ] [ 'prog' | -f progfile ] [ file ... ]-F指定分隔符,默认是空白字符-v定义变量-f指定脚本'prog'代码块file待处理的文件
4.2 代码块详解
代码块格式:
'BEGIN{} //{command1; command2} END{}'BEGIN初始化代码块,在对每一行进行处理之前,初始化代码,主要是引用全局变量,设置FS分隔符//匹配代码块,可以是字符串或正则表达式{}命令代码块,包含一条或多条命令;多条命令使用分号分隔END结尾代码块,在对每一行进行处理之后再执行的代码块,主要是进行最终计算或输出结尾摘要信息
4.3 内建变量
ARGC命令行参数个数ARGV命令行参数排列ENVIRON支持队列中系统环境变量的使用FILENAMEawk命令所处理的文件的名称FNR对每个文件进行行数单独编号FS设置输入域分隔符,等价于命令行 -F选项NF字段个数NR文件中的行数OFS输出域分隔符ORS输出记录分隔符RS控制记录分隔符$0表示整个当前行$1每行第一个字段- … …
$NF每行最后一个字段
5. 典型应用
(1)基本变量使用及输出
awk -F: '{print NR,NF$1,"\t",$0}' /etc/passwd 	//输出行号,每行字段数,每行第一个字段,整行的值
awk -F: 'NR==5 || NR==6{print}'  /etc/passwd 	//输出第5行和第6行
awk -F: 'NR!=5 && NR!=6{print}'  /etc/passwd 	//输出除了第5行和第6行
(2)使用匹配代码块(字符匹配)
awk '/root/{print $0}' /etc/passwd			//输出匹配root的行
awk '!/root/{print $0}' /etc/passwd			//输出不匹配root的行
awk '/root|mail/{print}' /etc/passwd		//输出匹配root或者mail的行
(3)条件语句
 awk -F: '$3>100 {print $0}' /etc/passwd
 awk -F: '{if($3>100){print $1}}' /etc/passwd
 awk -F: '$3+$4 > 200' /etc/passwd
 awk -F: '{if($3>100) print "large"; if($3>110) print "e large"}' /etc/passwd
(4)输出结果重定向
awk 'NR!=1{print > "./filename"}'  /etc/passwd
awk 'NR!=1{print}'  /etc/passwd > ./filename
(5)格式化输出
awk -F: '{printf "%-8s %-10s %-10s\n",1,2,$3}' /etc/passwd(6)使用数组
netstat -anp|awk 'NR!=1{a[$6]++} END{for (i in a) print i,"\t",a[i]}'(7)其他
ls -l|awk 'BEGIN{sum=0} !/^d/{sum+=$5} END{print "total size is:",int(sum/1024),"KB"}'	//统计当前目录下除了文件夹所有文件之和的大小

netstat -anp|awk '/LISTEN|CONNECTED/{sum[$6]++} END{for (i in sum) printf "%-10s %-6s %-3s \n", i," ",sum[i]}'	//统计状态为LISTEN和CONNECT的连接数量
