Welcome to GongMH's Blog!
keep study.-
php常用功能函数总结
- 一、数组相关:
- 1. 数组获取key(array_keys)
- 2. 数组获取value(array_values)
- 3. 两个数组合并(+)
- 4. 两个数组合并(array_merge)
- 5. 两个数组合并(array_combine)
- 6. 取出数组第一个key对应的value(array_shift)
- 7. 取出二维数组指定的列(array_column)
- 8. 数组的值进行unique(array_unique)
- 9. 数组替换(array_replace)
- 10. 数组中所有value之和(array_sum)
- 11. 用户自定义数组排序(usort)
- 12. 数组中所有值出现次数(array_count_values)
- 13. 数组填充(array_fill)
- 14. 数组去重(array_flip)
- 二、字符串相关
- 三、其他
一、数组相关:
1. 数组获取key(array_keys)
$arr = array(
    'a' => 'first',
    'b' => 'second',
    'c' => 'third',
    'd' => 'fourth',
);

print_r(array_keys($arr));

// Array
// (
//     [0] => a
//     [1] => b
//     [2] => c
//     [3] => d
// )
2. 数组获取value(array_values)
$arr = array(
    'a' => 'first',
    'b' => 'second',
    'c' => 'third',
    'd' => 'fourth',
);

print_r(array_values($arr));

// Array
// (
//     [0] => first
//     [1] => second
//     [2] => third
//     [3] => fourth
// )
3. 两个数组合并(+)
$arr = array(
    'a' => 'first',
    'b' => 'second',
    'c' => 'third',
    'd' => 'fourth',
);

$newarr = array(
    'd' => '4th',
    'e' => '5th',
);

print_r($arr + $newarr);

// Array
// (
//     [a] => first
//     [b] => second
//     [c] => third
//     [d] => fourth
//     [e] => 5th
// )
注意:两个数组key相等时,第二个数组不会覆盖第一个数组的value
4. 两个数组合并(array_merge)
$arr = array(
    'a' => 'first',
    'b' => 'second',
    'c' => 'third',
    'd' => 'fourth',
);

$newarr = array(
    'd' => '4th',
    'e' => '5th',
);

print_r(array_merge($arr, $newarr));

// Array
// (
//     [a] => first
//     [b] => second
//     [c] => third
//     [d] => 4th
//     [e] => 5th
// )
注意:两个数组key相等时,第二个数组会覆盖第一个数组的value
5. 两个数组合并(array_combine)
$arr = array(
    'a' => 'first',
    'b' => 'second',
    // 'c' => 'third',
    // 'd' => 'fourth',
);

$newarr = array(
    'd' => '4th',
    'e' => '5th',
);

print_r(array_combine($arr, $newarr));

// Array
// (
//     [first] => 4th
//     [second] => 5th
// )
注意:两个数组的元素个数要一致
6. 取出数组第一个key对应的value(array_shift)
$arr = array(
    'a' => 'first',
    'b' => 'second',
    'c' => 'third',
    'd' => 'fourth',
);

print_r(array_shift($arr));

// first
7. 取出二维数组指定的列(array_column)
$a = array(
  array(
    'id' => 5698,
    'first_name' => 'Bill',
    'last_name' => 'Gates',
  ),
  array(
    'id' => 4767,
    'first_name' => 'Steve',
    'last_name' => 'Jobs',
  ),
  array(
    'id' => 3809,
    'first_name' => 'Mark',
    'last_name' => 'Zuckerberg',
  )
);

print_r(array_column($a, 'last_name'));

// Array
// (
//   [0] => Gates
//   [1] => Jobs
//   [2] => Zuckerberg
// )
注意:php版本要5.5+
8. 数组的值进行unique(array_unique)
$arr = array(
    'a' => 'first',
    'b' => 'second',
    'c' => 'third',
    'd' => 'fourth',
    'e' => 'fourth',
);

print_r(array_unique($arr));

// Array
// (
//     [a] => first
//     [b] => second
//     [c] => third
//     [d] => fourth
// )
注意:当几个数组元素的值相等时,只保留第一个元素,其他的元素被删除。
9. 数组替换(array_replace)
$arr = array(
    'a' => 'first',
    'b' => 'second',
    'c' => 'third',
    'd' => 'fourth',
);
$newarr = array(
    'd' => '4th',
    'e' => '5th',
);
print_r(array_replace($arr, $newarr));

// Array
// (
//     [a] => first
//     [b] => second
//     [c] => third
//     [d] => 4th
//     [e] => 5th
// )
注意:如果一个键存在于第一个数组 array1 同时也存在于第二个数组 array2,第一个数组 array1 中的值将被第二个数组 array2 中的值替换。如果一个键仅存在于第一个数组 array1,它将保持不变。如果一个键存在于第二个数组 array2,但是不存在于第一个数组 array1,则会在第一个数组 array1 中创建这个元素。php版本5.3.0+
10. 数组中所有value之和(array_sum)
$arr = array(
    'a' => '1',
    'b' => '2',
    'c' => '3',
    'd' => '4',
);

print_r(array_sum($arr));

// 10
11. 用户自定义数组排序(usort)
$arr = array(
    'a' => '3',
    'b' => '2',
    'c' => '2',
    'd' => '4',
);
function my_sort($a,$b)
{
    if ($a==$b) return 0;
    return ($a<$b)?-1:1;
}

usort($arr,"my_sort");
print_r($arr);

// Array
// (
//     [0] => 2
//     [1] => 2
//     [2] => 3
//     [3] => 4
// )
12. 数组中所有值出现次数(array_count_values)
$arr = array(
    'a' => '3',
    'b' => '2',
    'c' => '2',
    'd' => '4',
);

print_r(array_count_values($arr));

// Array
// (
//     [3] => 1
//     [2] => 2
//     [4] => 1
// )
13. 数组填充(array_fill)
print_r(array_fill(3, 6, 'filled'));

// Array
// (
//     [3] => filled
//     [4] => filled
//     [5] => filled
//     [6] => filled
//     [7] => filled
//     [8] => filled
// )
14. 数组去重(array_flip)
$arr = array(
    'a' => 'first',
    'b' => 'second',
    'c' => 'third',
    'd' => 'fourth',
    'e' => 'fourth',
);

print_r(array_flip(array_flip($arr)));
// 注意与array_unique的区别
// Array
// (
//     [a] => first
//     [b] => second
//     [c] => third
//     [e] => fourth
// )
print_r(array_unique($arr));
// Array
// (
//     [a] => first
//     [b] => second
//     [c] => third
//     [d] => fourth
// )
注意:函数返回一个反转后的数组,如果同一值出现了多次,则最后一个键名将作为它的值,所有其他的键名都将丢失。
二、字符串相关
1. implode
2. explode
3. strstr
4.
三、其他
- array_sum(unpack(‘C*’, $metric)
- 一、数组相关:
-
mac出现bogon问题
问题引出:
在mac本机启动java web的时候,出现下面报错:
错误: 代理抛出异常错误: java.net.MalformedURLException: Local host name unknown: java.net.UnknownHostException: bogon: bogon: nodename nor servname provided, or not known原因:
mac的终端会先向DNS查询当前ip对应的反向域名解析的结果,如果查询不到再显示我们设置的计算机名。由于DNS服务错误地将保留地址反向的NS查询结果返回为bogon(虚拟、虚伪),而不是localhost,导致计算机名变成了bogon,又导致程序出错。
解决方法:
方法一:
设置hostname
	sudo hostname your-desired-host-name
	sudo scutil --set LocalHostName $(hostname)
	sudo scutil --set HostName $(hostname)
方法二:
设置DNS为
8.8.8.8。
-
PHP依赖管理工具 Composer
1. 介绍
Composer是PHP的依赖管理工具。我们只要声明项目中依赖的代码库,Composer能自动帮我们下载安装。
2. 安装
安装Composer,并且安装到全局目录中。
$ curl -sS https://getcomposer.org/installer | php
$ mv composer.phar /usr/local/bin/composer
这样就能直接使用composer命令。
$ composer3. 使用
3.1 创建
composer.json文件在项目根目录中创建
composer.json文件{ "require": { "monolog/monolog": "1.0.*" } }3.2 执行composer安装依赖
在项目根目录执行命令:
$ composer installcomposer会自动帮我们下载依赖,结构如下:
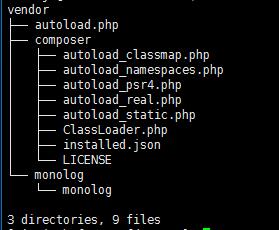
这时我们的项目中还会出现composer.lock文件,composer.lock文件中记录着依赖的版本号等信息。我们需要将该文件也提交到我们代码库中,这样任何人建立项目都是用的完全相同的依赖。3.3 使用已安装的库
composer会自动帮我们生成
vendor/autoload.php文件。我们只需引入这个文件,就能自动加载相应的库。require 'vendor/autoload.php';在项目中,我们就可以直接使用相应的库功能。
$log = new Monolog\Logger('name');
$log->pushHandler(new Monolog\Handler\StreeamHandler('app.log', Monolog\Logger::WARNING));

$log->addWarning('Foo');
4. 总结
composer是php的依赖管理工具,本文简单介绍其基本使用,更多内容请阅读官方文档。
-
生产环境中问题记录
在实际的生产环境中,各个系统都独立部署。系统间通过RPC调用,与单机环境有很多不同的地方。本文记录一些常见的case,希望对以后的开发中规避这些问题。
1. 数据库主从延时问题
有些场景下,我们需要先更新数据库然后读出数据再进行其他操作,这种在单机环境中不会有任何问题。但是实际生产环境数据库的部署是分主从的,主库用来更新操作,从库主要承担读的压力。数据库请求到来的时候,数据库上层有一个proxy,根据sql语句分发请求分别到主、从库。但是数据从主库同步到从库是有一定的时间间隔的,这个间隔从毫秒级到秒级都有可能,因此业务逻辑中要规避这种情况。
解决方案:
* 业务中规避先写再读的case,尽量通过程序控制先读再写。
* 对于必须要求先写再读的业务逻辑,可以联系dba,让这部分的读分发到主库。2. php curl的毫秒级超时问题
php业务中对外请求时,我们会设置超时时间,如果是秒级的超时,我们这样设置是没问题的:
    $timeout = 2; //2s超时
    curl_setopt($ch, CURLOPT_CONNECTTIMEOUT, $timeout); //连接超时
    curl_setopt($ch, CURLOPT_TIMEOUT, $timeout);    //处理超时
但是实际业务中常常需要设置毫秒级的超时时间,例如
$timeout = 0.1;//100ms超时再用上面的语句就会有问题了,你会发现超时时间根本没起作用。原因见 Curl的毫秒超时的一个”Bug”。如果需要毫秒级超时,必须设置CURLOPT_NOSIGNAL参数。$timeout = 0.1;//100ms超时 curl_setopt($ch, CURLOPT_NOSIGNAL, true); curl_setopt($ch, CURLOPT_CONNECTTIMEOUT_MS, $timeout * 1000); curl_setopt($ch, CURLOPT_TIMEOUT_MS, $timeout * 1000);
-
PHP扩展--xdebug
xdebug是一个开源的php代码调试工具,支持运行时栈输出,运行时函数调用跟踪,代码覆盖率分析,性能数据采集以及内部状态显示
1.下载安装xdebug
在xdebug下载页,我们选择合适的版本进行安装,本文使用centos系列。
- 下载源码
$ wget http://xdebug.org/files/xdebug-2.3.3.tgz - 解压安装
 $ tar zxvf xdebug-2.3.3.tgz
 $ cd xdebug-2.3.3
 $ phpize
 $ ./configure
 $ make && make install
2.配置xdebug
修改php.ini文件
[Xdebug]
xdebug.profiler_enable=On
xdebug.trace_output_dir=/YOU_WANT_TO_SAVE_PATH/xdebug-output
xdebug.profiler_output_dir=/YOU_WANT_TO_SAVE_PATH/xdebug-output
web服务需要重启php-fpm
3.使用xdebug
现在每次调用php脚本,就会自动在
YOU_WANT_TO_SAVE_PATH/xdebug-output生成相应的新能数据文件。4. 分析性能文件
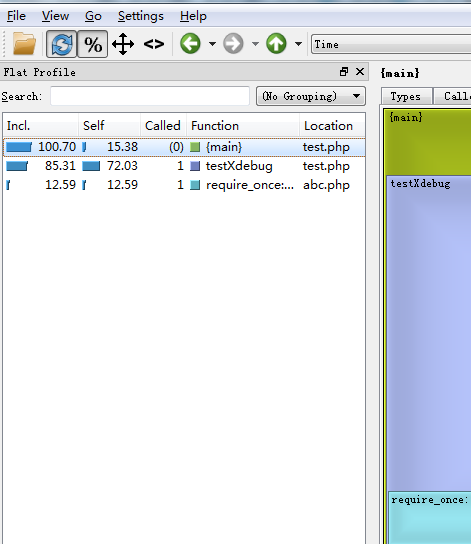
性能文件可以使用专门的工具(win/mac下可以使用QCacheGrind,linux下可以使用KCacheGrind)。以QCacheGrind为例,界面左侧”Flat Profile”展示函数调用列表,
Incl.包括子函数的调用时间,Self为去除子函数后自身消耗的时间。5. 示例
示例代码
//test.php
<?php
testXdebug();
function testXdebug() {
    require_once('abc.php');
}

//abc.php
<?php
    echo "hello";
profile分析效果:
5. 扩展资料
- xdebug文档
xdebub-doc - 360开源的PHP分析工具
phptrace
- 下载源码
-
工具教程--sublime使用记录
1. sublime2
1.1 安装package control
通过
ctrl+~或者View->Show Console调出控制台,然后输入一下内容回车,在线安装。import urllib2,os,hashlib; h = 'df21e130d211cfc94d9b0905775a7c0f' + '1e3d39e33b79698005270310898eea76'; pf = 'Package Control.sublime-package'; ipp = sublime.installed_packages_path(); os.makedirs( ipp ) if not os.path.exists(ipp) else None; urllib2.install_opener( urllib2.build_opener( urllib2.ProxyHandler()) ); by = urllib2.urlopen( 'http://packagecontrol.io/' + pf.replace(' ', '%20')).read(); dh = hashlib.sha256(by).hexdigest(); open( os.path.join( ipp, pf), 'wb' ).write(by) if dh == h else None; print('Error validating download (got %s instead of %s), please try manual install' % (dh, h) if dh != h else 'Please restart Sublime Text to finish installation')也可以通过下面方式离线安装
package control- Click the
Preferences > Browse Packages…menu - Browse up a folder and then into the
Installed Packages/folder - Download Package
Control.sublime-packageand copy it into the Installed Packages/ directory - Restart Sublime Text
1.2 sublime2 安装插件
* shift + ctrl + p
* 输入install package
* 输入插件名回车就可以了自动安装
1.3 sublime2 删除插件
* shift + ctrl + p
* 输入remove package
* 选择要删除的插件回车
2. sublime3
2.1 安装package control
通过
ctrl+~或者View->Show Console调出控制台,然后输入一下内容回车。import urllib.request,os,hashlib; h = 'df21e130d211cfc94d9b0905775a7c0f' + '1e3d39e33b79698005270310898eea76'; pf = 'Package Control.sublime-package'; ipp = sublime.installed_packages_path(); urllib.request.install_opener( urllib.request.build_opener( urllib.request.ProxyHandler()) ); by = urllib.request.urlopen( 'http://packagecontrol.io/' + pf.replace(' ', '%20')).read(); dh = hashlib.sha256(by).hexdigest(); print('Error validating download (got %s instead of %s), please try manual install' % (dh, h)) if dh != h else open(os.path.join( ipp, pf), 'wb' ).write(by)3. 其他设置
在Preference中设置参数即可。
3.1 将tab键自动替换为4个空格
          // The number of spaces a tab is considered equal to
          “tab_size”: 4,
          // Set to true to insert spaces when tab is pressed
          “translate_tabs_to_spaces”: true,
- Click the